Rajma Recipe (Easy Rajma Masala)
This rajma recipe is a very easy way to make rajma masala or kidney beans curry. The gravy is thick and luscious, bursting with flavours with kidney beans that will melt in your mouth. Rajma Chawal is pure comfort food and this recipe will become a favourite!
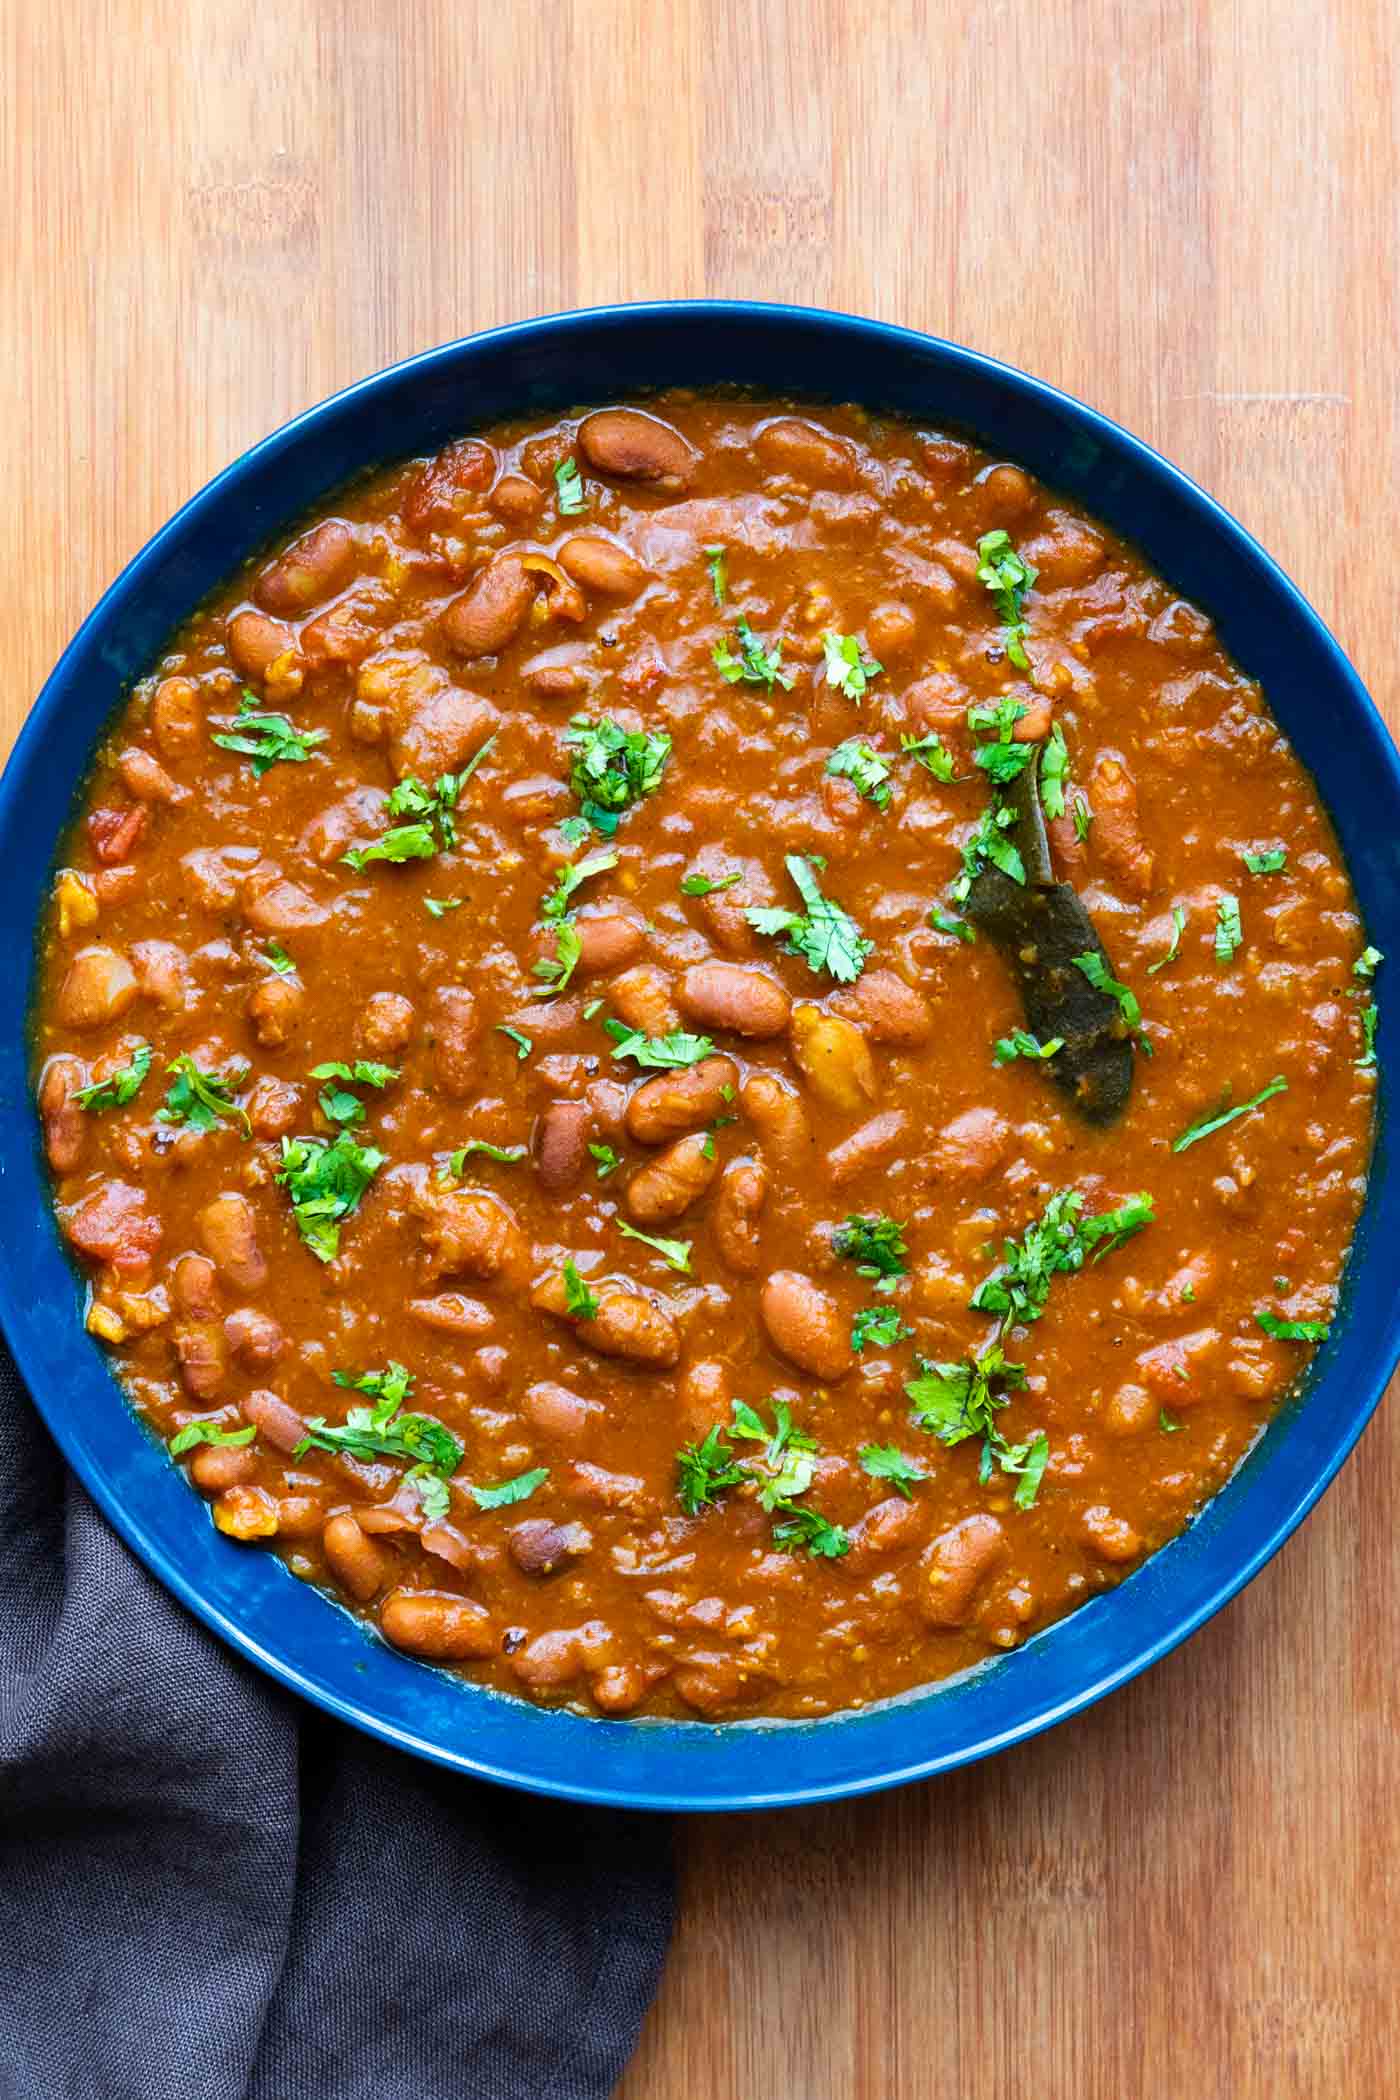
Growing up rajma chawal (rajma masala with steamed rice) was made every week at home. And there’s something about piping hot rajma masala and steamed rice topped with ghee and served with lachha pyaaz (sliced onions) on the side that brings everyone together!
This is typical punjabi style rajma masala recipe made with a spicy onion tomato paste. You can also swap the entire onion tomato paste with my bhuna masala if you have some in your freezer because it cuts the cooking time considerably!
Rajma Masala is a really simple, one pot curry. And it’s even a great beginner friendly recipe if you are just starting to cook. No matter what you do, you can’t go wrong. And the rajma itself has so much flavour that even the most basic masalas can make it taste awesome!
Ingredients for Rajma Masala
You’ll need a few basic ingredients for this rajma recipe. These should be easily available in your pantry. This may seem simple, but together these ingredients make a stellar gravy!
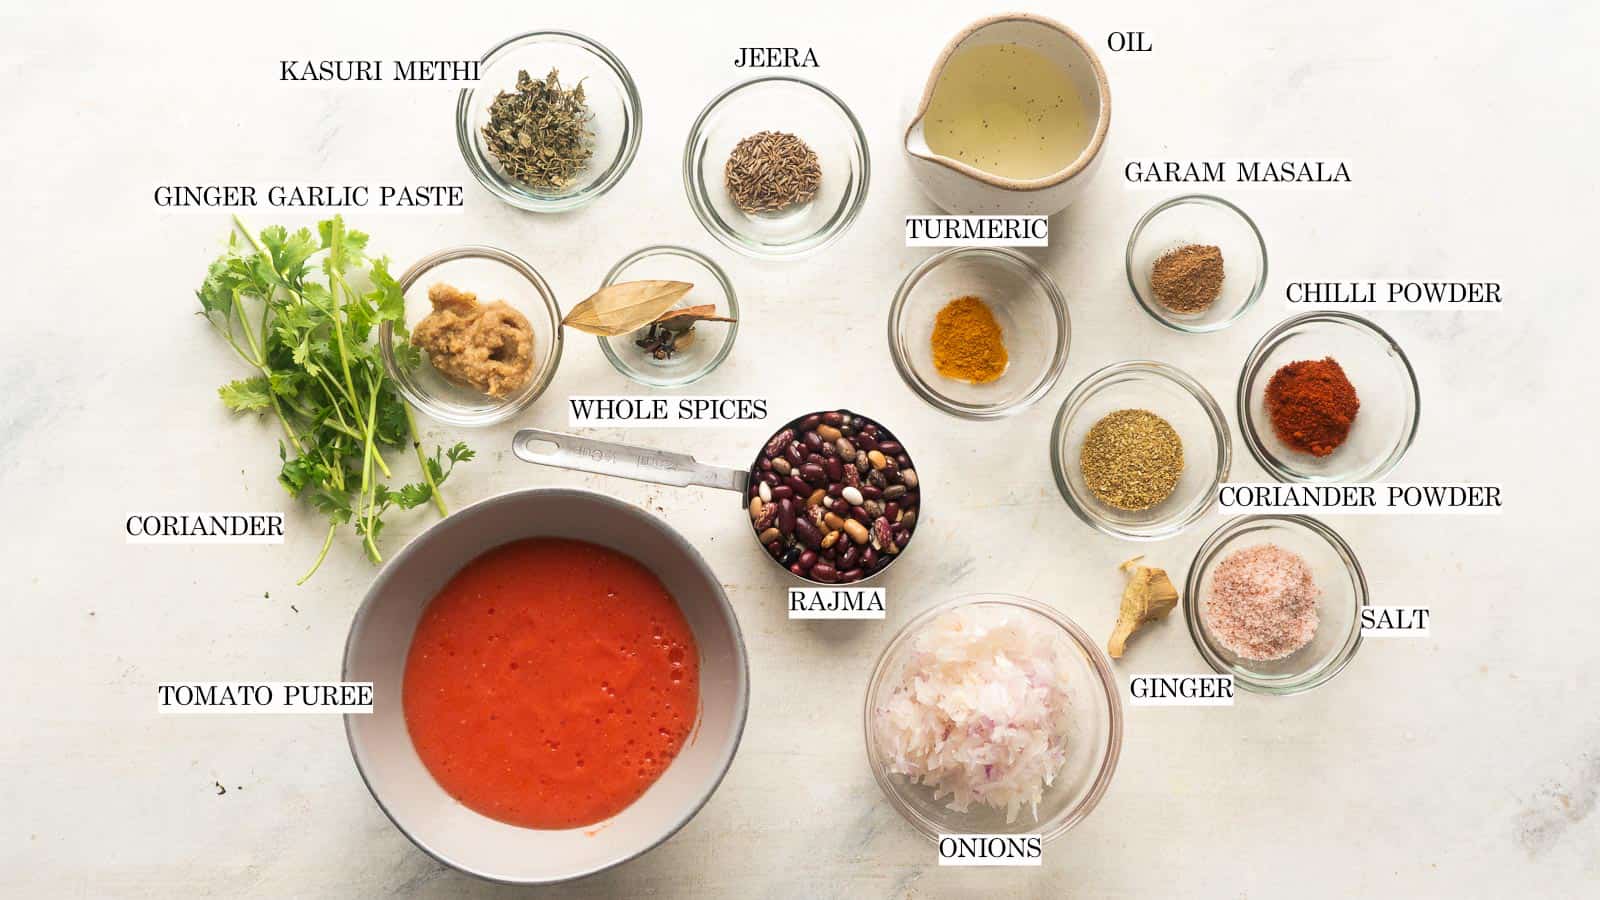
- Spices: We’ll need some basic whole spices such as jeera (cumin), bayleaf (tejpatta), laung (cloves) and dalchini (cinnamon). The whole spices add flavour right in the beginning
- Rajma (Kidney Beans): You can choose to use any variety of Rajma or kidney beans. I like to use red beans versus the striped or light brown ones because I prefer the flavour of those. In the picture here, you’ll notice that its mixed kidney beans which also taste fantastic if you can get hold of the blend. I like cooking kidney beans from scratch because that’s how we’ve always made them and it’s easier to control the seasoning and the cooking consistency. But you can easily swap this with canned beans. This recipe uses 1.5 cups cooked kidney beans which comes from .5 cup raw beans. To swap, use 1.5 cups drained canned beans.
- Ginger Garlic Paste: Ginger and garlic ground together in equal quantities. You can use minced ginger or garlic or just smash them roughly with a mortar pestle. We are also using chopped ginger garlic at the end in the tempering for an extra boost of flavour.
- Grated Onions because they caramelise beautifully without becoming too pasty and give volume to the gravy
- Tomato Puree because I prefer the consistency of pureed tomatoes in this curry as opposed to chopped tomatoes.
- Dry Ground Spices: We use a simple blend of coriander powder, turmeric, chilli powder, salt and garam masala
- Kasuri Methi: You’ll see this ingredient in a lot of my Indian recipes and its definitely a must-have. I love that it adds a smoky, nicely rounded flavour at the end in the gravy. If you can’t source it, skip it but it’s highly recommended.
- Coriander: Lots of it for freshness and vibrance right at the end!
How to cook Kidney Beans or Rajma
There are two different ways to cook Rajma or Kidney beans. But before you cook them, it’s important to soak them for 8-10 hours. Soaking helps tenderise the beans for cooking, and it also removes phytic acid which makes it easier to digest beans. I’ve explained all about this in my article about soaking beans. Discard the soaking liquid and use fresh water for cooking.
Pressure Cooker Method: The most common and the most efficient method is cooking rajma in the pressure cooker. If you are using a traditional pressure cooker, cook for 5-6 whistles on a low flame. This will take 30-40 minutes till the rajma becomes soft and tender and can be mashed easily between your fingers. In an Instant Pot, cook rajma for 35 minutes on manual pressure and then manual pressure release after 10 minutes of pressure releasing naturally.
Stovetop Method: Soaked beans can take up two hours to cook on the stovetop, which in my opinion is a waste of energy and time. If you do use this method, make sure you have enough water in the pot because Rajma soaks up a lot of water while cooking.
How to make Rajma Masala
Here’s a quick step by step to show you how to make Rajma Masala:
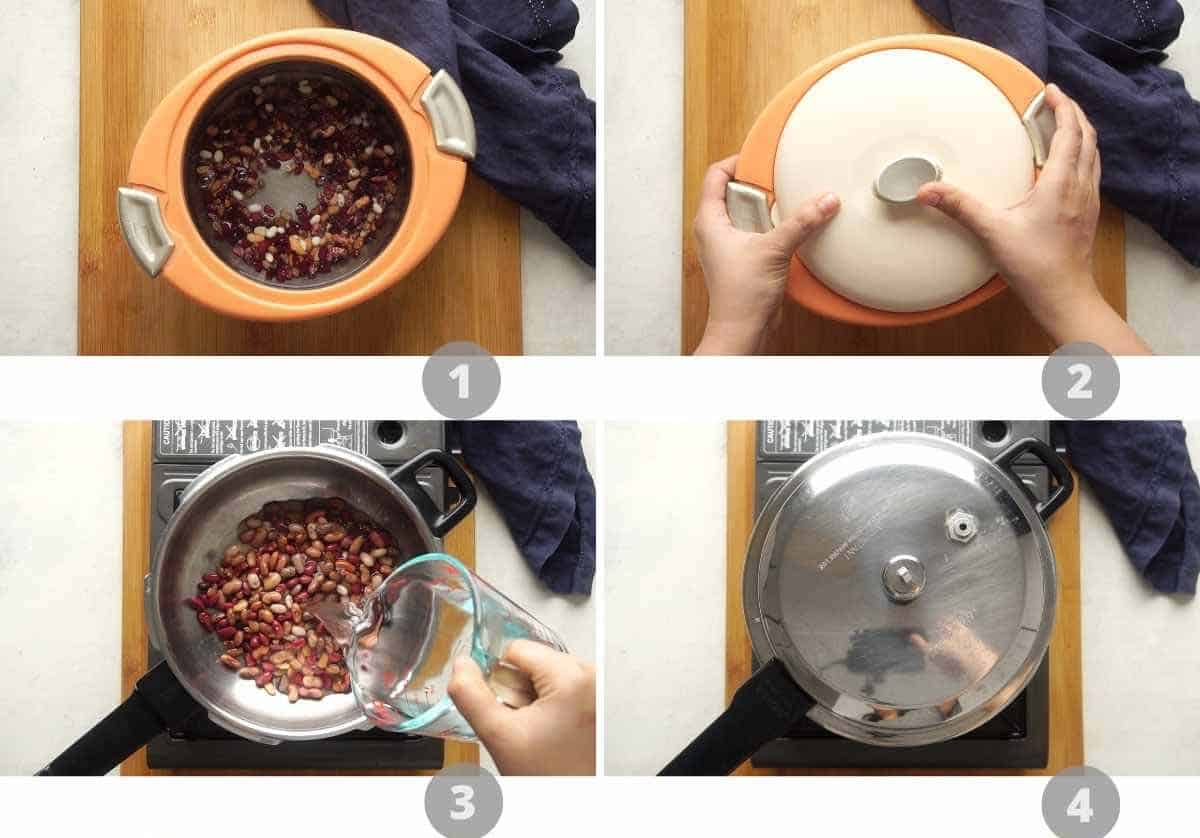
- Soak rajma overnight
- Or use my quick soaking method to soak it in an hour. Soak it in hot water in a casserole or a container with a lid
- Drain the soaking water, and add rajma to the pressure cooker with 2 cups of water.
- Cook on a medium flame for 5-6 whistles or about 30-35 minutes. Let the pressure release naturally while you make the gravy.
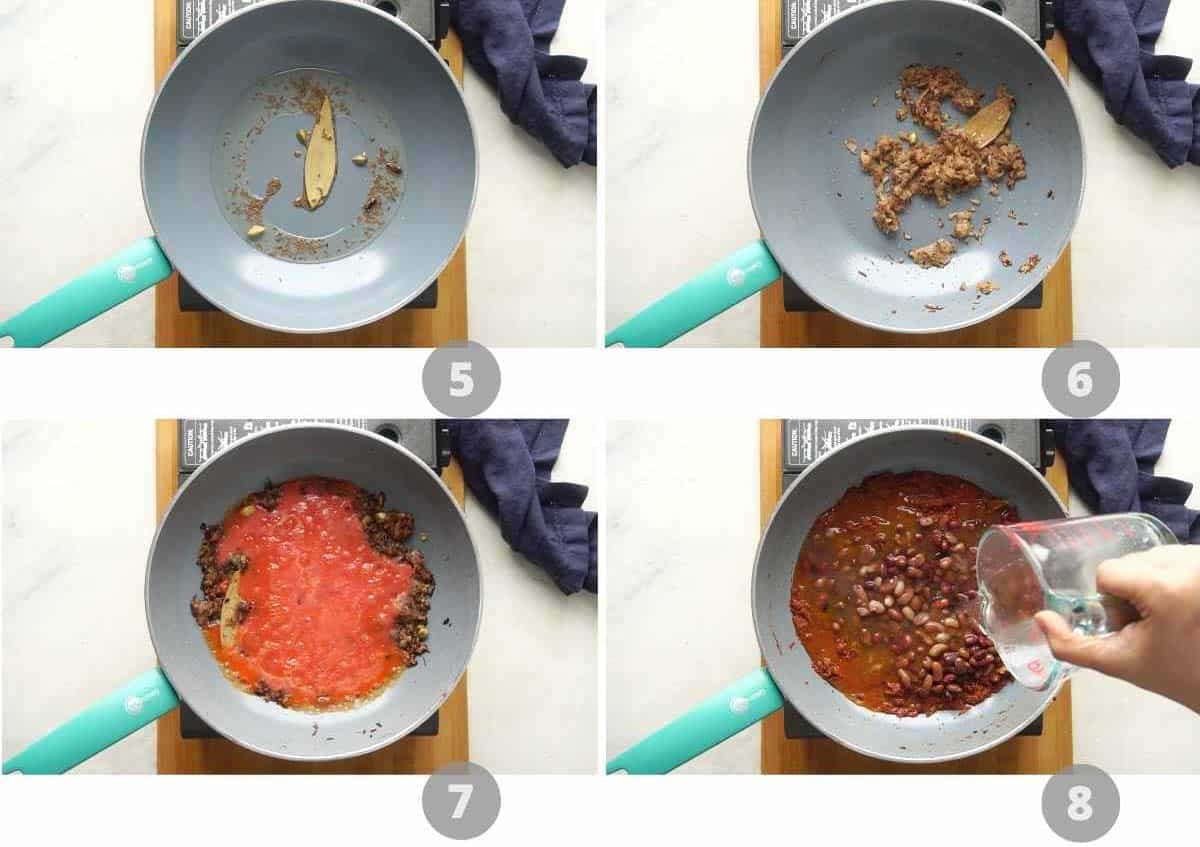
5. Heat oil in a kadhai and add cumin, bay leaf, cardamom and cloves. Once the cumin seeds start spluttering add grated onions.
6. Cook these for 2-3 minutes and add ginger garlic paste. Cook this mixture on a low flame for 10-12 minutes till the onions turn a golden brown colour and soften.
7. Add tomato puree, chilli powder, coriander powder, turmeric and salt. Saute this on a high flame for a minute or two and then reduce the flame and let this cook partially covered for 8-10 minutes till the oil starts coming on the top and sides.
8. Add cooked rajma (along with cooking liquid), and one cup of water to the pan. Mix well and let this simmer gently for 10 minutes or longer till the gravy thickens.
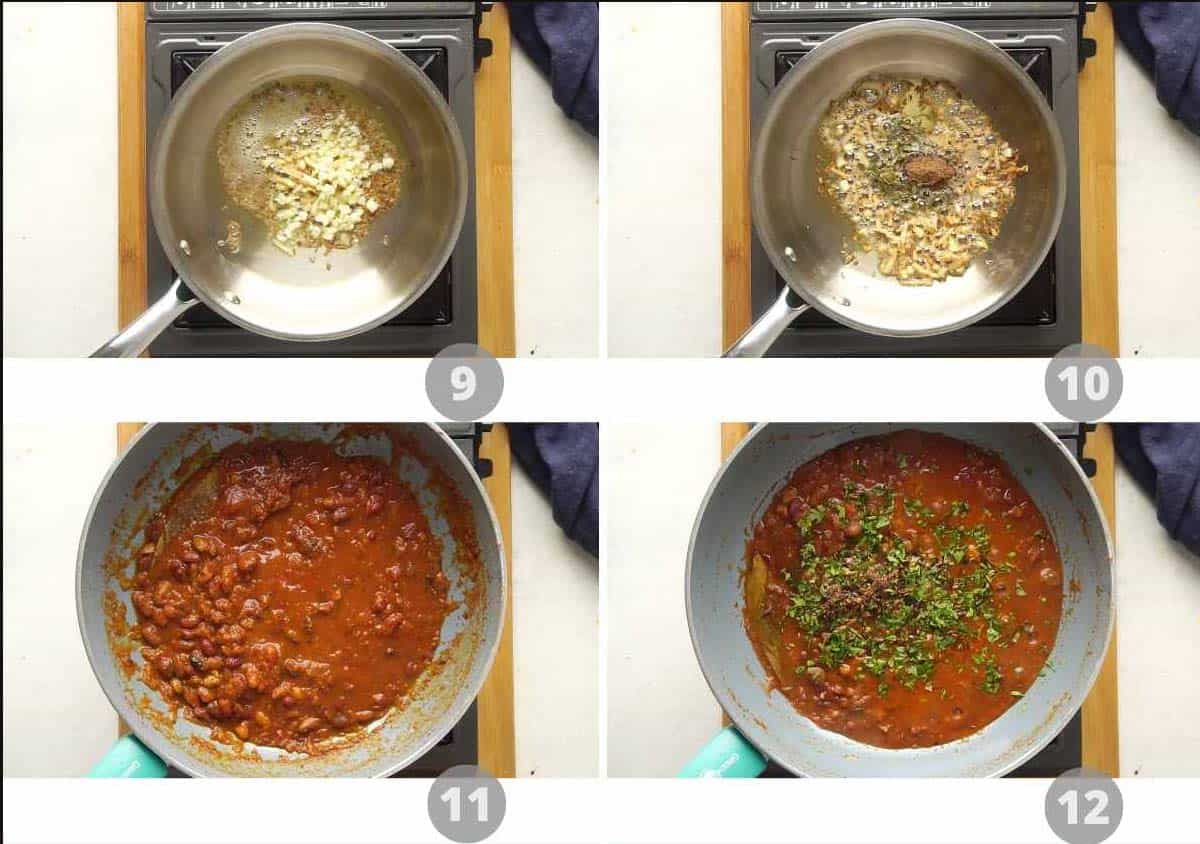
9. To make the tempering, heat ghee and add cumin, ginger and garlic.
10. Saute for a minute or two and add kasuri methi and garam masala.
11. Turn off the flame and pour this all over hot rajma. Mix well.
12. Sprinkle it with fresh coriander and serve hot with steamed rice!
Top tips to make awesome Rajma Recipe
- Make sure you use new rajma or kidney beans. Beans older than 6-8 months can take longer to cook, although there is nothing wrong with them. So check your packaging date when buying
- Soaking is an important step when making any beans. It makes beans easier to digest by removing phytic acid. I’ve detailed this in my article about soaking beans which also has a quick soaking method (beans soaked in 1 hour).
- Cook the rajma till really tender. Rajma in any rajma curry or gravy should be so tender that it should melt in your mouth without any resistance. In this recipe, we cook the rajma first and then add it to the curry. You can also make the curry, add soaked rajma and pressure cook everything together. Both methods work really well!
- Swap the onion tomato paste for ¾ cup Bhuna Masala if you have that ready!
- This recipe is naturally gluten friendly and can be made vegan by swapping the ghee in tempering for oil
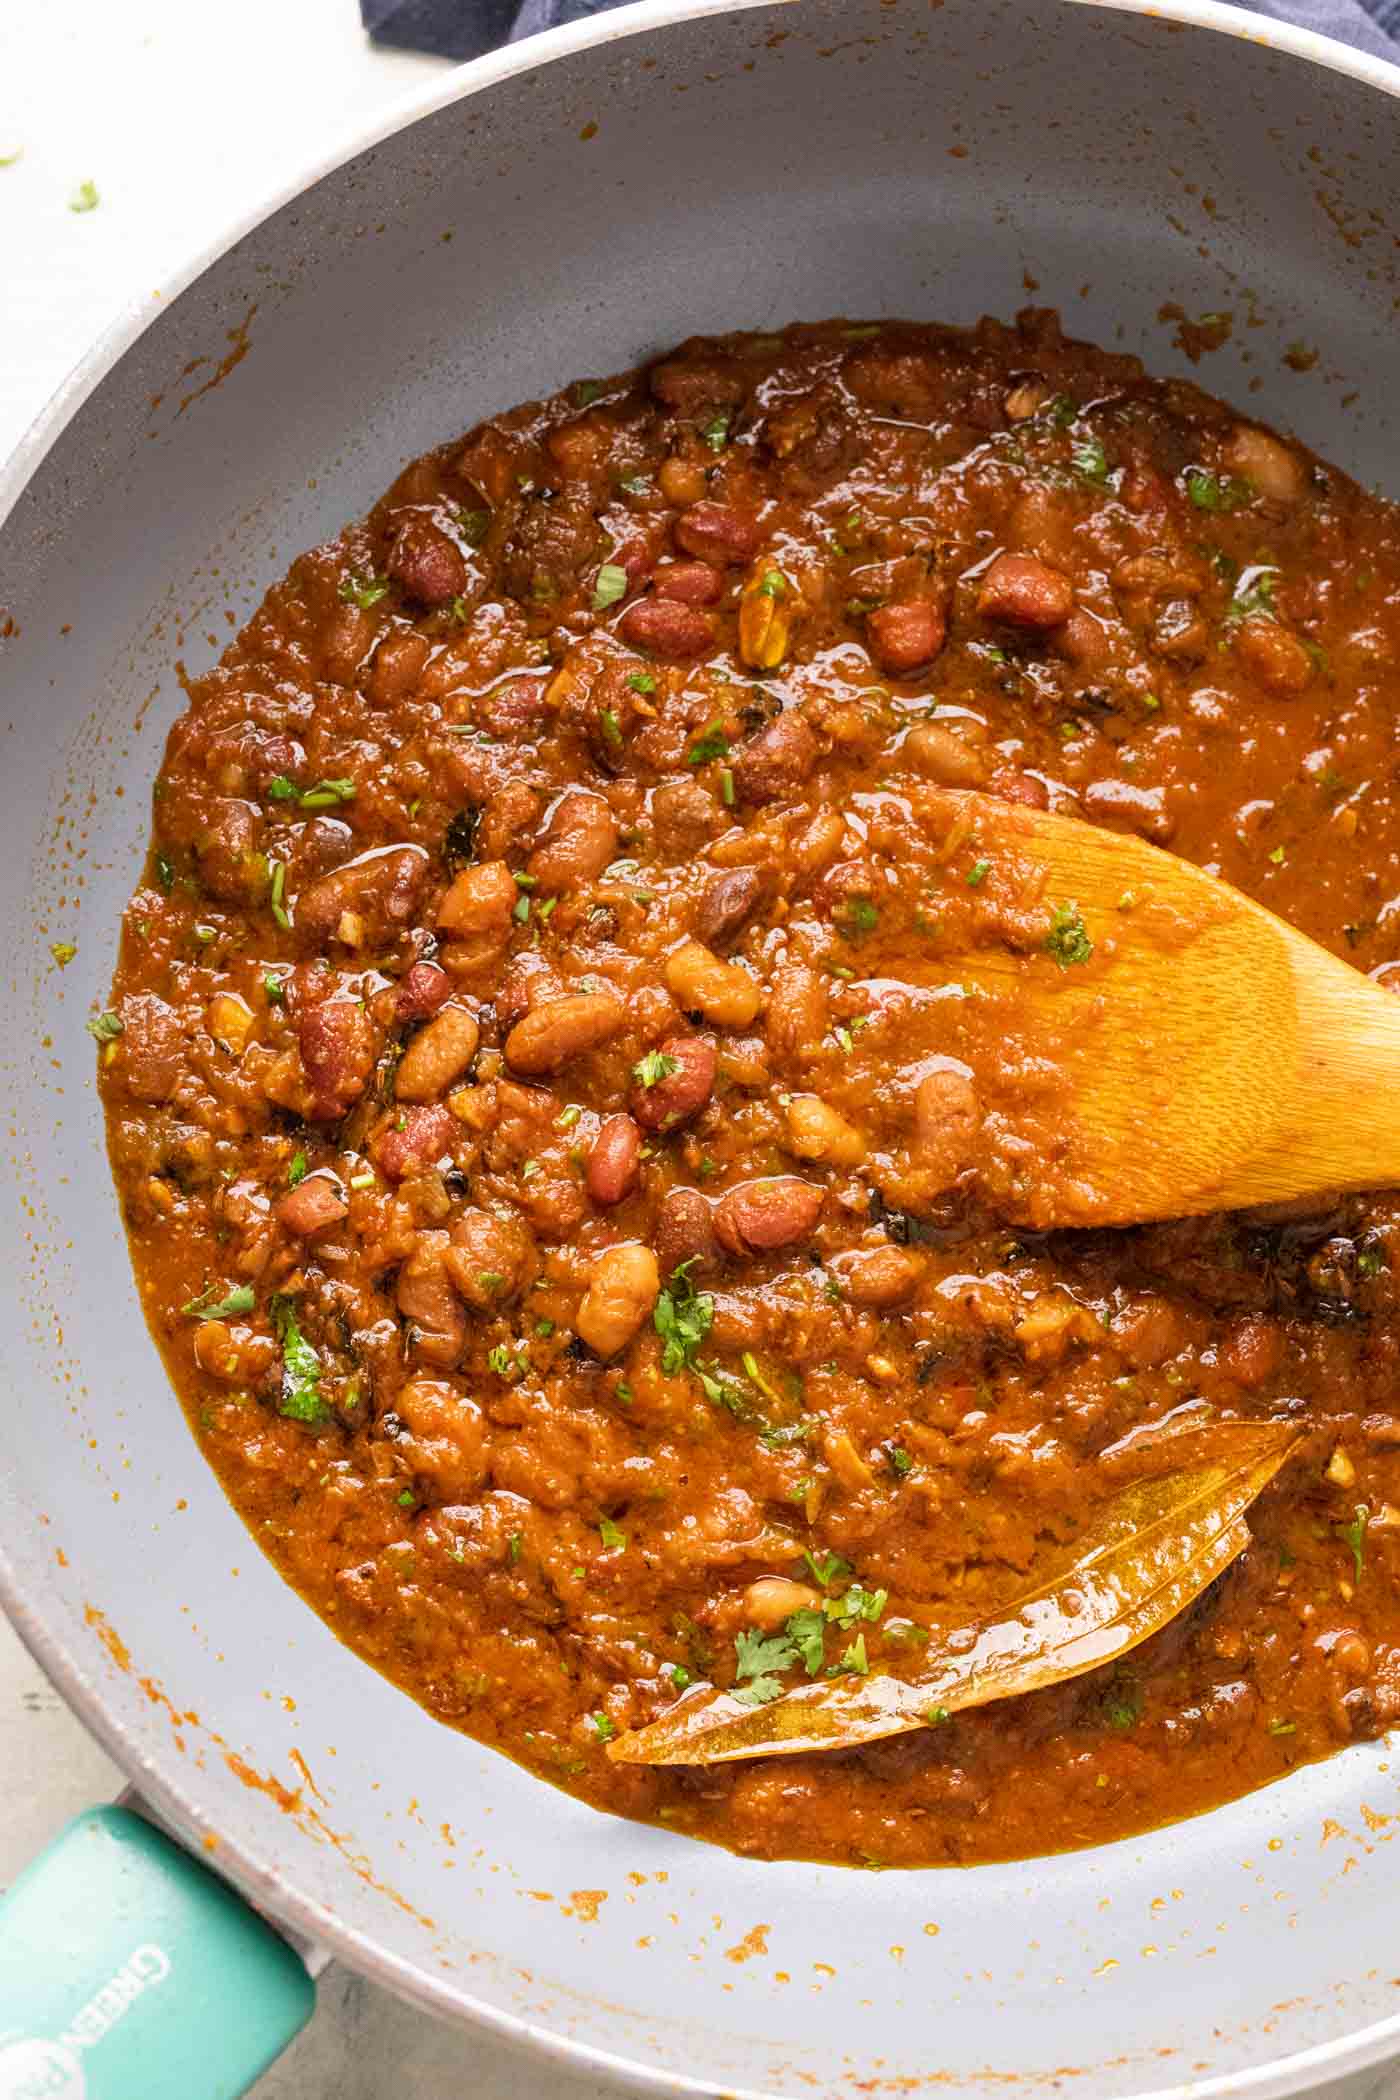
Rajma Masala has my heart! You don’t even need a second dish with this. Just serve it with rotis, aloo pyaaz ki sabzi, steamed rice or jeera rice and lots of lachha pyaz and you’ve got yourself pure comfort food!
Watch the Video

Rajma Recipe (Easy Rajma Masala)
Rajma Masala is comfort food at its best. Kidney beans or rajma is cooked and then simmered in a luscious onion tomato gravy till thick and tasty. Best served with steamed rice and ghee!
Print
Pin
Rate
Servings: 4 people
Calories: 195kcal
Instructions
-
Soak rajma overnight or use my quick soaking method to soak it in an hour.
-
Drain the soaking water, and add rajma to the pressure cooker with 2 cups of water. Cook on a medium flame for 5-6 whistles or about 30-35 minutes. Let the pressure release naturally while you make the gravy.
-
Heat oil in a kadhai and add cumin, bay leaf, cardamom and cloves. Once the cumin seeds start spluttering add grated onions. Cook these for 2-3 minutes and add ginger garlic paste. Cook this mixture on a low flame for 10-12 minutes till the onions turn a golden brown colour and soften.
-
Add tomato puree, chilli powder, coriander powder, turmeric and salt. Saute this on a high flame for a minute or two and then reduce the flame and let this cook partially covered for 8-10 minutes till the oil starts coming on the top and sides.
-
Add cooked rajma (along with cooking liquid), and one cup of water to the pan. Mix well and let this simmer gently for 10 minutes or longer till the gravy thickens.
-
To make the tempering, heat ghee and add cumin, ginger and garlic. Saute for a minute or two and add kasuri methi and garam masala. Turn off the flame and pour this all over hot rajma.
-
Sprinkle it with fresh coriander and serve hot with steamed rice!
Notes
- This is typical punjabi style rajma masala recipe made with a spicy onion tomato paste. You can also swap the entire onion tomato paste with my bhuna masala if you have some in your freezer because it cuts the cooking time considerably!
- You can choose to use any variety of Rajma or kidney beans. I like to use red beans versus the striped or light brown ones because I prefer the flavour of those.
- Make sure you use new rajma or kidney beans. Beans older than 6-8 months can take longer to cook, although there is nothing wrong with them. So check your packaging date when buying
- Soaking is an important step when making any beans. It makes beans easier to digest by removing phytic acid. I’ve detailed this in my article about soaking beans which also has a quick soaking method (beans soaked in 1 hour).
- Cook the rajma till really tender. Rajma in any rajma curry or gravy should be so tender that it should melt in your mouth without any resistance. In this recipe, we cook the rajma first and then add it to the curry. You can also make the curry, add soaked rajma and pressure cook everything together. Both methods work really well!
- I use grated onions because they caramelise beautifully without becoming too pasty and give volume to the gravy
- Kasuri Methi adds a smoky, nicely rounded flavour at the end in the gravy. If you can’t source it, skip it but it’s highly recommended.
- Swap the onion tomato paste for ¾ cup Bhuna Masala if you have that ready!
- This recipe is naturally gluten friendly and can be made vegan by swapping the ghee in tempering for oil
Nutrition
Calories: 195kcal | Carbohydrates: 19g | Protein: 5g | Fat: 12g | Saturated Fat: 3g | Polyunsaturated Fat: 2g | Monounsaturated Fat: 6g | Trans Fat: 1g | Cholesterol: 10mg | Sodium: 893mg | Potassium: 509mg | Fiber: 6g | Sugar: 5g | Vitamin A: 1045IU | Vitamin C: 18mg | Calcium: 66mg | Iron: 3mg

